There are many ways, but listed below are some that comes to mind. You can use these actions that will inevitably position yourself as a leader at work without being too obvious about your ambitions.

1. Take Responsibility

You want to be a leader at work, learn to take responsibility for anything that has your fingerprint on it. That means, as long as you participate in the project, you have a hand at the failure of the project.
Learn to take responsibility for not just the good things, but even bad ones. Admit to your mistakes - it’s okay to be wrong. You cannot learn if you have not made any mistakes.

2. Believe In Win-Win

A rising tide lifts all boats – always think win-win. It exists. Just because the world thinks the business world is nasty, and that you need to be manipulative and maneuvering to win, you need not participate in it.
In fact, make it your contribution not to be nasty and bullying in your ways. You want to be a leader at work, believe in your hands as leader to change the world.
The power of positive influence you have on the people around you and the power to inspire people to greater heights is in front of you.

3. Push The Envelope

Try new things. Take some risk. Make yourself uncomfortable. Do the things that may risk making you look foolish – what do you have to lose? Leaders take risks. They are not afraid of doing what they believe.
What do you believe in that you are willing to take some risk? To be a leader at work, you need to take even simple risks like taking on the project no one wants.

4. Do It, Write It

I have often said this. This world is full of people who talk too much and don’t do enough. If you want to be a leader at work, act upon something. Work that plan.
If you have any ideas that are simmering in your mind, write it down. It doesn’t matter if it’s not a plan yet, just write it down.
If you don’t write it down, there is no one to present to and there is no record of the idea. How can it count? If you want to be a leader at work, you have practice writing down everything.

5. See Opportunities Everywhere

There is no need to create opportunities for yourself to lead. The opportunities to lead are everywhere. You need to be mindful of these opportunities.
I have just mentioned one earlier. Are there any opportunities to take on the project no one wants? If you don’t see opportunities everywhere, you are missing the point.

6. Be Open

Be open to criticism, otherwise you are just living off yourself. What does it mean? When you are open to feedback, you are being fed ideas from others that are free. Often times, these ideas come from people smarter than you. They will give you tips on how to improve and how to be better.
That’s what a leader needs - constant feedback. You need feedback to be a leader at work, otherwise you are “feed-own” (I just created that word to mean feeding yourself) and you will go hungry soon. With no new ideas, a leader dries up.

7. Give, Give, Give

That’s how you open up. Pour out all you got from inside you. Give all you have ideas, thoughts, plans. Feel the vulnerability and learn to like it. When you pour all your ideas out you will need new ones. Where do new ideas come from? From critics who want to tear you down, from well-meaning supporters and from people you least expect.
More comes back to you. You have more to input. It enriches you. That’s how you become a leader at work.
These are the seven actions to position yourself as a leader at work. You want to be a leader at work? Do not be afraid of taking risks. You have more to gain than lose when you open up.


Hiring managers are tasked with the impossible job of learning a candidate inside and out after just a few interactions. That’s why they’re always coming up with new tactics to extract every last drop of information from a candidate. It’s important to keep your guard up!  You can almost be sure some of the questions asked will be “interview traps” – interview questions designed to get you to reveal some critical bit of information about yourself that you might have preferred to remain covered. They come in many forms, but all have the common goal of getting you to expose some character flaw that will bump you down a few rungs in the rankings.
Hold it together! Here are 10 of the most popular “interview traps” and tips on how to use them to your advantage.
The setup: Why is there a gap in your work history?
The trap: Does all this time off work mean you’re lazy?
It’s not necessarily a problem to have a gap on your resume. If you pursued personal projects, took care of a sick relative, volunteered for charity or otherwise used your time off in a productive manner, let them know. They don’t care that you haven’t spent any recent time in an office – only that you haven’t spent it all on the couch.
The setup: What would the person who likes you least in the world say about you?
The trap: Are you aware of your own weaknesses – and how to work around them?
A cousin to “what’s your biggest weakness?,” this question also requires framing your dominant personality traits in a positive light. Perhaps your enemy would say you’re neurotic and controlling, when in fact you just have a completionist’s eye for detail, which will ensure no project is finished until all loose ends are tied and re-tied for peace of mind.
The setup: Describe when you were part of a team that could not get along.
The trap: Do you work well with people you don’t like?
No matter whose fault it actually was, the interviewer will assume you can’t work well with others if you complain about a dysfunctional team buried in your work history. What matters to them is how you handled the situation – did you allow room for discussions and ideas you may not have agreed with? Did you learn any lessons about give-and-take from clashing with a coworker?
The setup: If you could change one thing about your last job, what would it be?
The trap: Are you holding on to any lingering issues you couldn’t resolve at your last job?
Can you vocalize your problems in a professional manner and come to a diplomatic understanding with your coworkers / bosses? This question tests whether you let problems stew and boil over, or whether you can address them rationally with the benefit of a positive work environment in mind.
The setup: Explain ________ (your industry) to your nephew / grandmother / totally oblivious client.
The trap: Sure, you know your line of work – but can you communicate your responsibilities to others?
Are you a good communicator? As a developer, can you explain how the newest product feature operates in a way that the marketing team can process, so they can in turn pitch it to customers? If you can’t explain your job duties in plain English, you probably aren’t well-versed enough in the field to effectively communicate your needs to the coworkers you will interact with on a daily basis.
The setup: Tell me about yourself.
The trap: Are you lying on your resume? Are you confident you’re qualified for this job?
Don’t meander. This also tests your communication skills – whether you know how to pitch, and whether you know when to stop talking. Succinctly list education history, skills gained from previous jobs, and perhaps a personal project or two which enhances your skill set and demonstrates motivation outside of the workplace. Then, stop talking. Rambling indicates a lack of confidence, suggesting you’re not sure whether what you’ve listed is “enough” to qualify you for the job.
The setup: Why should we hire you?
The trap: Are you a good fit for this specific role and company?
If you can’t answer this question, you probably didn’t research the company you’re trying to work for. Make sure you know the specific functions your future role will entail, and the short- and long-term goals of the organization itself. Then, frame your skills in a context which aligns with the job description and the company’s direction.
It also doesn’t hurt to research the hiring board to find out what makes them tick, so you can carry the conversation if they mention a project from their background.
The setup: What’s your ideal job?
The trap: …Is it something other than this one?
It’s okay to have career aspirations, so long as the things you want to do overlap with the things you’ll be doing here. Avoid mentioning a title – it may not carry the clout in this company’s role structure that you think it does. Instead, discuss the problems you’d like to solve, platforms you want to work with, and other active engagements that encompass both your dream work and the work in front of you.
The setup: What annoys you about coworkers / bosses?
The trap: Are you easy to work with, or are you a Negative Nancy?
It’s never a good idea to badmouth a coworker, whether peer or superior. It’s best to say you’ve been fortunate to navigate amicable work relationships. If pressed, mention an attribute that highlights dedication to the company cause, and say that you will expect and encourage that same dedication from your peers.
The setup: If you won the lottery, would you still work?
The trap: Are you motivated to succeed?
Most people know this question aims to trap candidates for whom work is merely a means to an end, rather than a passion to which they will be dedicated. But it’s also facetious to say you’d stay in your current position if you were to be blessed with such fortunes. It’s perfectly acceptable to say you’d start your own company, charity or project to further your personal development. This question really gets at whether you’re naturally inclined to work, so make sure those imaginary piles of cash would enable some form of future productivity.


There is an old saying in the business world that goes, "Poor prior planning leads to particularly poor programs." This is especially true in the video industry.
If you go out into the field or studio without a plan for your shoot, you will end up wasting a great deal of time deciding what you want to do. In this industry, as in others, time is money. It is much more cost-effective to make your shooting decisions sitting at home alone or with a small pre-production team than to make those decisions on location while the cast and crew wait for you to make up your mind.

Why and Who

The first place to start in planning your shoot is with a look at the purpose of the video and the intended audience. Knowing why you are shooting your footage, as well as the audience for which you are shooting, is very important when planning your shoot.
For a promotional video, you have to decide what shots will best show the wonderful assets of the organization or location. If you are trying to persuade an audience, identify those shots that will best support your point of view. For instance, if shooting a fundraising piece for a new facility, you would want images of the facility looking its worst, showing worn-out equipment and using a telephoto lens to make the rooms look smaller and the spaces cramped. For showing an audience how to weld, you would have to include the equipment setup, safety features and procedures, prepping the materials and the welding process itself in a step-by-step process.
Knowing the purpose of the video will also help you plan for special equipment you may need. Do you want smooth-moving shots that need a dolly? Maybe you'll need several cameras to catch one-of-a-kind actions from multiple angles. Walk your client through the purpose of your video, so that very little catches you by surprise on location.
Knowing your audience is also very important when planning your shoot. If youre shooting for a younger audience weaned on MTV, you will need to make your camera movements quicker and less fluid, with perhaps moving angles and more camera movement than for productions for an older audience. This doesn't mean you go out and shoot handheld grungy video just because you are shooting for a younger audience. You can still shoot with a plan, a tripod and a purpose; you just need to be willing to move away from conventional steady video and maneuver the camera on your tripod in a more seemingly haphazard way. Really good haphazard shooting that emphasizes the message you're trying to send is done with a great deal of planning, superb camera control and, above all else, a plan.

Where and When

One of the best ways to prepare for a video shoot is to do a location scout. Evaluate your location to determine if there will be any problems and to see if the location fits your needs - not only aesthetically but also physically. On your location scout, determine power availability (do you have enough for all of your lights, camera, etc.?); parking for the crew, cast and client; access to location (are you going to be lugging equipment up five floors because the elevator is out!); restrooms; food (a fed crew is a happy crew!); and water. Make sure you visit the location at the same time of day that you will be shooting. This will let you accurately evaluate noise levels coming from both inside and out (are you on a major flight path or ambulance route? Is there a big barking dog nearby?); traffic (is the traffic noise especially heavy at that time of day?); and light (will you have sun coming through the windows?). You will also have to figure out how weather will affect the location.

Every director wants to get a bigger audience for their videos. Get a free report that will show you how to get more people to see your videos on YouTube. Read more...

What and How

Now that you know why and for whom the project will be shot, as well as where and when, you need to concentrate on what to shoot and how to plan that shoot. Most people jump into these areas first, but they are actually the last steps in the planning process.
If you've done a good job with the who and why part of the production plan, what to shoot is totally determined by your script - the blueprint for the production. If you dont have a script, you will need to go back to the who and why part of the plan, and take a hard look at the what that will satisfy the reason for your production. Shooting a production without a script is much like building a house without a set of blueprints. You get the whole thing built, only to find that you cant get into the bathroom because you forgot to plan for a door.
The best way to determine the what is to make a comprehensive list of everything you want to see and hear in the video. This list will eventually become a shot list, but you have to do a few things to it before it becomes final. This is where the how comes in. Making a huge shot list will not be very helpful if you end up shooting various parts of it at different locations and at different times. The large list of shots and sounds is just the beginning. You then break it down into locations and a shooting schedule.
When creating a shooting schedule, you have to take into account a number of parameters that will help you create the most efficient schedule that will save you time and money.
In order of priority, you first plan your schedule around locations: schedule the hard-to-get-locations before filling out the rest of the schedule. This doesnt mean they have to be the first shots, just the first to be scheduled. You also want to consider travel time and ease of access - combining a number of close locations on the same day, etc.
The second priority is cast member or other talent availability. Again, this does not mean you have to begin when they are available; you just have to make sure the schedule works around their availability. It is very important to have both a location and talent standing by if there are cancellations or changes due to location availability or weather. Always schedule your exteriors towards the beginning of your schedule, so that, if it rains, you can catch up later. Again, you will want to have an interior shoot location standing by, just in case Mother Nature becomes a bit of a pain. Any time you schedule a shoot at night, you have to have plenty of rest time for your crew. As you go through your plan, try to schedule around all of the previous parameters first, but then add sequential shooting to the mix to keep everyone on the same page.
If you use children, you have to schedule around them. Child actors have very strict rules on their education, time on the set, shooting conditions and time available. You also must schedule around the child's parent or guardian.
You also have to schedule around time of day, time of year, special events, special equipment, stunts and other one-of-a-kind problems. Aim to plan the shortest shoot schedule possible, especially if you have to rent equipment and pay crews and actors. Remember the weekends! Renting equipment on the weekends gives you three days of use for the price of one.
Once you have your schedule, write up your shot list, including all of the coverage you will need for each shot. Coverage includes all of the different angles and shot sizes you may want of each action. Dont forget the cutaways! Plan them in by making a list of possible cutaways found at each location. The more specific your shot list, the easier it will be when you get on location.

Remember: Plan Your Shoot and Shoot Your Plan!

In scuba training, they teach you to plan your dive and dive your plan. Even what seems like a simple diversion from your dive plan could have deadly consequences! Planning your shoot and then shooting the plan may not save lives, but it will definitely save time and money.
Dr. Robert G. Nulph teaches college-level video and film production and is an independent video/film director.
Source: VideoMaker


The point of view, often simply referenced as POV, is an important approach of your movie that you might not think about, but it can strengthen the overall story telling aspect
A POV can imply a particular shot, a scene, or an entire movie and the POV is usually the vantage point from a character: who saw what, where and when, so to speak. A POV shot is implied that what the camera is looking at is what the character is seeing - it is usually shot at that person's eye height, whether they are sitting, sprawled on the ground or standing up. For example, a neutral shot that shows a small boy hanging upside down from the playground monkey bars might revert to a POV shot of what he sees upside down.
Another example: you see a wide shot of a woman sitting at the kitchen table (Neutral POV shot) and the doorbell rings. She gets up and walks to the door. The camera follows her, but as she opens the door, the camera now reveals a POV shot of exactly what she sees. The next shot might be her reaction in a neutral shot or it can then be a POV shot of the person (or object) she sees, looking back at her.

Working with multiple cameras can be a big challenge -- especially when you've only got one chance to get it right. Learn some tips to get it right the first time. Read more...
Setting a particular camera angle to reveal the perspective of your character is a power full way to control how your audience might react or accept your characters.

Secrets and Plots
Sometimes, an entire movie can be shown at a particular point of view that can give hints to the secrets within the story that might be revealed at the end. Remember the 1999 horror-drama The Sixth Sense by director M. Night Shyamalan? In it, after a crucial plot defining scene in the beginning, the rest of the scenes all have the two main characters in them - either Doctor Malcolm Crowe (Bruce Willis) or the troubled youth, Cole Sear (Haley Joel Osment). The choice of the director to shoot the movie with the point of view of only these two characters was one clue to Dr. Crowe's fate. Osment's famous line "I see dead people", and the color red were other clues.
Movies with talking animals are often shot completely from the animal's vantage point, like Homeward Bound or might combine the animals' POV with that of their human handlers, as in Beverly Hills Chihuahua.

Not all movies have a specific POV, but when you work them into your story, you often strengthen your movie's plotline and give it better direction. And sometimes, it's fun for the audience to figure it out. For instance director Robert Altman's "whodunit" murder-mystery Gosford Park, set in a classic British style of murder at an English country estate, presented the entire movie through the point of view of the servants. With a huge cast including the captivating Helen Mirren, along with Michael Gambon and Maggie Smith of Harry Potter fame, the movie is witty and complex as ever. You might think that you're watching a classic "Have vs. Have nots" Upstairs/Downstairs style movie, but there's not a single scene that doesn't have a servant lurking in the background, hearing and seeing everything that goes on in the country manor.

Shooting a movie from your main character's point of view is called subjective - your audience sees everything through his or her eyes. This is classic style for Film Noir detective movies; you can almost hear the gritty-voiced leading man telling the mystery woman that appears at his door, "I smell trouble with a capital T."

But often, it's only select scenes that appear to have a specific point of view - the rest of the movie might be neutral. In Peter Jackson's The Lord of the Rings triliogy, when the character Gollum (Andy Serkis) struggled with his conscience, you saw Gollum's "good side" through the point of view from his bad self.

The opening scene of Francis Ford Coppola's 1972 hit, The Godfather was shot entirely from Don Corleon's point of view - you saw the lowly characters groveling at The Don's feet - perceived as a cold, soulless character.

Often POV is neutral, until a scene change calls for something more direct. A dance scene or a fight scene might be intercut with shots of each character's POV who often interact with the camera's POV. Many movies with a main cast of children might show adults as only necessary beings to drive a child from place to place, but who are often oblivious to the children's world. the POV is from the kids' perspective, parents are just ancillary characters until necessary to the plot. Super 8 is one such example: kids get into all sorts of mayhem that no adult would condone, had they had a hint of awareness of what the kids were up to.

Then there's the point of view where there's some magical character that only one person can see. The Ghost and Mrs. Muir is a classic example where only Mrs. Muir can see or interact with the ghost inhabiting her new home. Can you think of any more?
Watch Movies!
Here's a few more examples of movies with different points of view:
The Blair Witch Project: 1999 - POV of the main character through "found footage."
Tora! Tora! Tora!: 1970 - In the early days of Western war films, most war movies were filmed from the victor's point of view. "Tora! Tora! Tora!" broke that mold by featuring both American and Japanese point of view during the attack on Pearl Harbor.
Vantage Point: 2008 - The story is of an assassination attempt of the U.S. president told through the perspective of several characters. Each time a different character tells his or her story, the events unfold with a new vantage point and more details are revealed.
You're Looking at Me Like I Live Here and I Don't: 2012 - A haunting and loving POV narrative of an Alzheimer's patient and how she interacts with the world around her.
Invasion: 2005 - A real-time story from director Albert Pyun of an alien invasion seen from the point of view of the dashcam of a small town police car.

Coming up with plotlines, characters and shots is hard enough when making a video, trying to blend in a specialized point of view rather than a neutral POV adds some difficulty to the mix, but it also adds interest. Your best lesson: watch movies. Lots of them. Try to define the character's purpose and examine what the movie's vantage point, or point of view is - you're on the next step to movie greatness!

Source: Video Maker

lighting-wide-shots-living-room

Shooting a wide shot seems easy, but setting up the lighting is a big challenge - getting all the elements in the scene lit correctly and looking natural takes finesse.
Imagine an assignment that requires you to capture an entire room without panning the camera or taking cutaway shots. Doesn't sound too difficult until you arrive and discover that the room is too dimly lit for decent video and it's incredibly large. You can rely on the ambient light and turn up the gain and get marginal results or you can bring in your kit and light it yourself.
The problem with large rooms is they usually require very wide shots and your lights have to cover so much space. This can be one of your most challenging assignments, particularly when your producer or director thinks that the larger the room the easier it is to shoot. This is common scenario so it would be a good idea to gain an understanding of how to approach this wide angle lighting problem.

Big Rooms - Big Headache

wide shot can be in a large hotel lobby or it can be a small kitchen that you might find in an urban walk-up. Either way you are required to produce good results with natural appearing lighting. In many situations, your greatest asset is also your greatest nemesis, because not only do your lights illuminate the area but they often get in the way, and with larger rooms your lights are farther away from the subject. One of the problems with artificial lighting such as florescent lighting or incandescent lamp fixtures in a building, or artificial lighting you create, is the light falloff. The intensity of the light emitted from a fixture attenuates at a very fast rate. That's why interior lighting designers specify so many lights in their designs and why exterior lighting designers put so many lights in parking lots.
Walk into a well lit office and you will see dozens if not hundreds of smaller fixtures evenly spaced on the ceiling. Drive by a new car lot and you'll see it teeming with tall, evenly spaced lighting structures.
A properly lit room can be dramatic with nice shadows and sharp specular highlights but is still functional. A high-end restaurant usually has dramatic, contrasty lighting but you can always see well enough to get around. Lighting designers could just mount a few huge lights at each of the four corners of the space and let everyone near the light fixtures painfully endure the intensity of the lights, while the people in the center of the space live in the dark. Designers have discovered through experience that a few high powered lights don't work well when lighting large spaces. It produces very contrasty lighting.
Very brightly lit areas and too dimly lit areas in the same space can be tolerated by humans due to our ability to see in many lighting situations but it can be exhausting to spend any time in such lighting conditions. Contrasty lighting is uncomfortable, but our eyes are so adapted to seeing in these situations, all we need are sunglasses to reduce the dynamic range. Our camcorders are much less forgiving and can only record very compressed lighting dynamics.
As a videographer you must learn to recognize dynamic lighting situations and adjust your camcorder or alter the camera's controls to accommodate its limits. One way to avoid contrasty lighting is to select what you choose to record, like not including windows in your shot or avoiding areas that are in direct sunlight and have deep shadows. You can also shoot when the sun has set and the dynamics of the outdoor light and indoor light are more closely matched. Finding the golden hours near sunset can always help you deal with sunlight.


Dramatic and Natural

With event videography you can't always choose when or where to shoot and frequently you must bring in your own lighting, which shouldn't be too difficult, but there are times when it seems that everything conspires to foul up your day. Wide shots, whether in a large, dimly lit room or a small, high contrast room can be very difficult.
As mentioned earlier, the lighting found in parking lots and large offices have two things in common. They both have lots of evenly spaced smaller fixtures and the lighting is placed so it comes from above and that can be your key to successful video lighting. When you place several smaller lights in a scene you eliminate the effects of rapid light fall-off from one light, and you produce a more natural evenly lit scene, and the way to do that is to use whatever lamps, fixtures and windows that are already present. Whether you use a boom to light from above or use bounce lighting you're aiming for better distribution of light across the entire space.
Figure A shows a large room in the foreground and a similar room in the background. Both have large windows on the right and absolutely no overhead lighting in the ceiling. The lamps were pretty much useless for adding light, and anything that was not exposed to the window light was too dark. Here the light falloff from the window was pretty intense so the wall on the left with the picture on it was much darker than the back of the red sofa on the right of the set. The ceiling was an obvious feature of the room so that had to show well and the overall ambience was very soft.
The best way to retain the design of this room lighting was to place several small powered lights around the room and several higher-powered lights behind the camera. The key here is to not overpower the existing light but to accommodate it, to respect it's beauty and accentuate it. You should work with what you have and not over-light the shadows. The smaller lights were mounted on background stands pointed slightly down and evenly placed behind the sofa on the right side wall along the entire length of the room.
On the wall between the built-in cabinet and the painting you can see the effects where the light is brighter just above the sofa. It's not natural but it looks good and separates the wall from the sofa. Whenever you see a well lit set you can carefully look for hints of how the lighting director lit the room and this is an obvious hint.
If you look into the other room you can see the same effect along that wall, too. As for the larger lights they were simply spread out along the wall behind the camera and pointed facing backwards into the wall where they picked up the nice warmth of the painted walls and reflected it right back into the room. You can see the warm reflection in the corner of the table leg facing the camera while the leg to the right shows a bluish reflection from the window. Once again using these hints can help you figure out how the set was lit. The other room was lit the same way only the lights were placed in the right and left corners of the room. All of these lights were basically fill lights while the main lights were from the windows.

Scrims and Spill Working Together

Figure B shows how lots of smaller lights placed all round the room can create an interesting effect while remaining natural and treating each detail in a unique way. In this room there were only lights from the existing fixtures and they were mounted in the ceiling and provided very little light but they provided nice highlights after the room was ready for shooting. The entire mantel is softly lit.
Placed along the left of the set were several 8-foot by 10-foot scrims hanging from booms with several high powered lights behind them. This provides the overall lighting for the mantel. One of those lights was gelled blue and moved closer to the scrims (about two feet) and created the blue reflections along the right of the mantel while the others were about eight feet from the scrims and created a nice soft wall of light. Since most of the lights were far from the scrims, they spilled over into the room providing the splashes of light seen along the ceiling and a little spill-over seen along the back of the sofa in front of the set. A raw light was placed to the left of the set to provide the highlight on the sofa in the back of the set. One large scrim was placed on the wall to the side of the fireplace to provide the soft reflections on the cabinets at the back of the set. The lighting behind that cabinet is the existing lighting as found in the room. The ceiling lights provide the warm highlights on the back sofa and the mantel.
Most serious video producers have at least one reliable light, and many more have a three-point kit. You might not own all this extra equipment but it's possible to find these at a lighting equipment rental storeand some theater rental houses.

Sidebar: Free Lessons - Lighting Designers' Work is All Around You

With event videography, it's important to use as much of the existing lighting as you can and adjust your lighting to match that so as to create natural lighting that best expresses the situation. Usually in high-end spaces the lighting designers have created a beautiful ambience so it's a good habit to study just how they treat the room lighting and how they light each element within the room. Many times they can become your teacher and you become better educated with each new experience.
Restaurants and fine hotel lobbies are great places to learn about natural lighting so whenever you have the opportunity to study these spaces, by all means do so. Remember though what you see in the real world rarely works out in your camcorder. It's easy to overpower the existing lighting with your video lights and lose all the beautiful ambience, so always approach your lighting with a "less is more" attitude and you will fare much better, with less frustration.
Whenever you're watching a film or TV show, pay attention to not only the obvious lighting of each star but also to the ambient lighting because often times this is where the jewels of knowledge are. And look for hints that help you solve the mystery of how those masters light their sets.

SOurce: VideoMaker


Horror Film Lighting On a Budget


You don't need a full complement of expensive gear to make a horror film. The beauty of this genre is oftentimes, the grittier it is, the better it is.
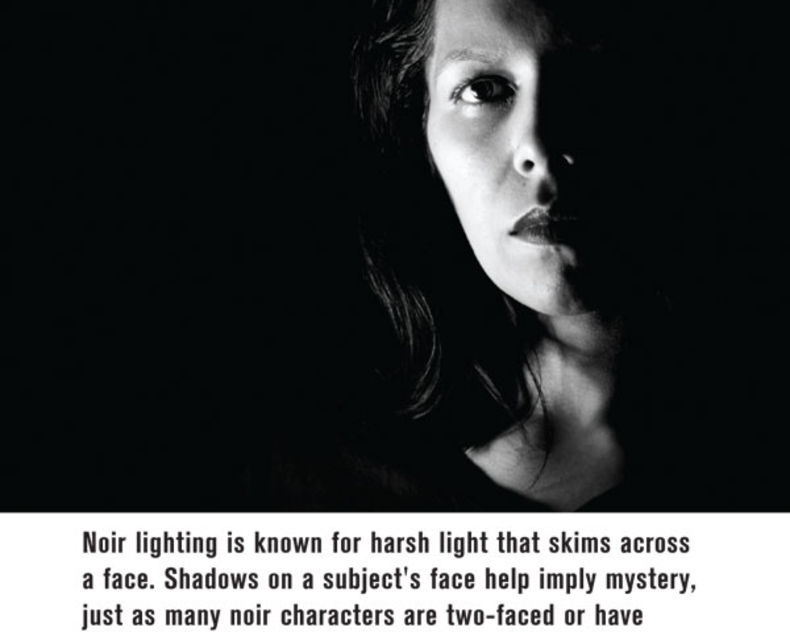
What's more fun than scaring the heck out of your friends. You know, sneaking up behind them and dangling a squiggly rubber worm on a shoulder or blasting out of a closet just to see them nearly jump out of their shoes. It never gets old does it? Well neither does classic horror film lighting where everything is hidden in deep, ambiguous shadows and what is revealed is projected in hard, contrasty light. This is noir lighting that's incredibly fun to do and is an effective way to promote a sense of mystery or imminent doom in horror movie effects.
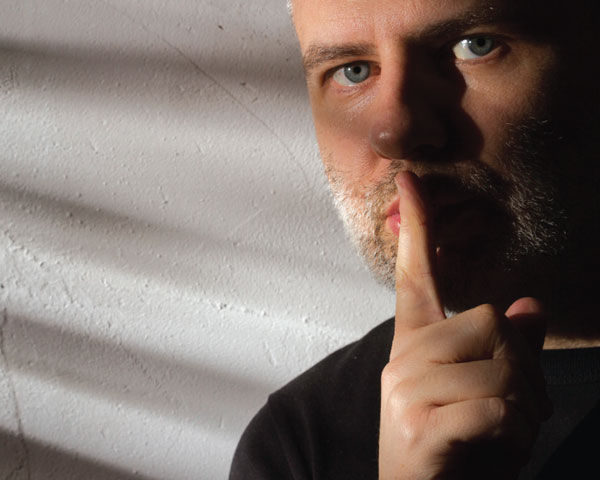
A skilled director or special effects designer can evoke these emotions in the audience with a simple flicker of light or slight movement of a shadow while the audience doesn't even realize they are under a spell. A subtle blink of red light that vanishes as quickly as it appears mixed with a dash of blue ambient is all the ingredients a director needs to force the audience into a state of tension. Mix in an abrupt splash of harsh light skimming across a face and the audience will release all that tension in a sudden burst of emotions. And it doesn't always take any specialized lighting equipment or lighting studio. All it takes, with a little practice, is a few well placed lights armed with color gels and an assistant to jiggle things around a bit.

Creative Expression

Setting up horror film lighting is fun and easy. You just need to understand light, color and placement of shadows for that spooky effect that garners goose bumps every time. Filmmaking is fun and horror movies are no exception, it's all about creative expression, letting go and creating the unexpected. The best way to do that is with lighting because unlike walls, furniture and people, production lighting is easily manipulated and doesn't put up a fuss when you want it to be dramatic. With a little experimenting you can get lighting to do whatever you want. Unlike acting where there's a fine line between a great performance and overacting, horror film lighting is always expected to be over-the-top, so let's get started.
Every director wants to get a bigger audience for their videos. Get a free report that will show you how to get more people to see your videos on YouTube. Read more...

Light and Dark

The first thing you need is darkness and the best way to get that is to shoot at night or better yet in a well-lit room, which to your camcorder, can be just about every room in the house. This can work because you turn down the gain on your camcorder to get "darkness" and bring in lights for exact shadows. Yep, day-for-night shooting is an old Hollywood trick. Shoot in broad daylight, turn down the camera and turn up the lights. Hollywood shoots in daylight so that crew members can see while they're working and they don't have to work at night and earn overtime. The other benefit is the camera works best with the gain turned down and it's just a lot easier to shoot in daylight. Indoors you are going to need some powerful lights and outdoors you are going to need more powerful lights so it's probably easier to do day-for-night shooting indoors during the day - and any month when the 13th falls on a Friday!

Harsh Light

The lighting needs to be pretty harsh so don't even think about soft boxes or umbrellas. They create soft, diffused light, which is great for bathing your subject in a flattering even light, which is the last thing you want in horror lighting. You want harsh, almost violent lighting along with dark ambiguous shadows.
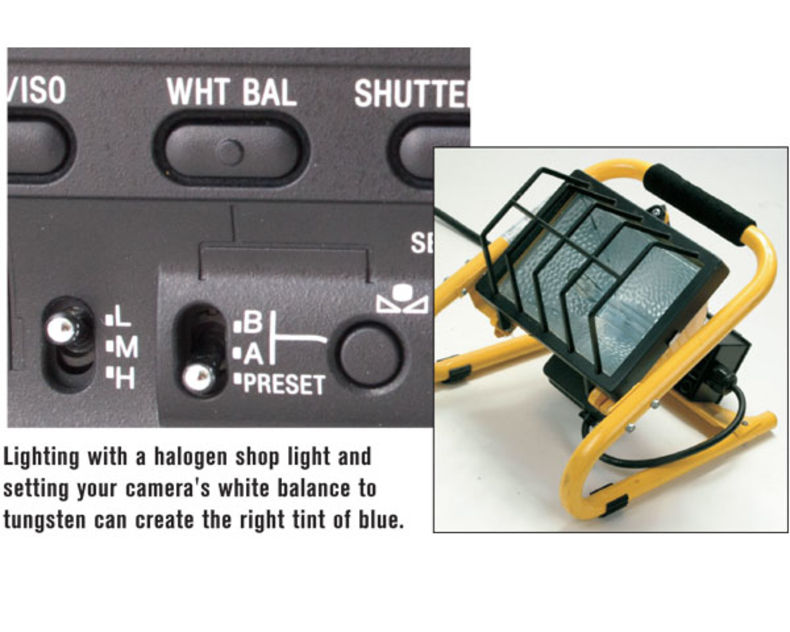
Shadows - where the creepies live - and of course the creepies are always painted in a dramatic blue ambient light, and one way to get that blue tint is to white balance your camera to tungsten because that harsh, contrasty light from your cheap halogen shop lights is tungsten which has a warm color temperature. When you white balance the camera to tungsten (also known as indoor) the light from the halogen shop light becomes neutral and the ambient room light becomes blue because the halogen lights have a warmer color temperature than both daylight and ambient room lighting from windows.
We're talking about making a low budget horror film not a professional lighting design, so the halogen shop lights are perfect for harsh lighting ,and with this technique you get a great color contrast between the two different light sources without the use of gels, which simplifies your production tremendously.
The room light from any window or doorway should be enough for ambient lighting and you have adjusted your camera so that the ambient light is a bit dark, now all you need to do is light your subjects.

Flags and Moving Lights

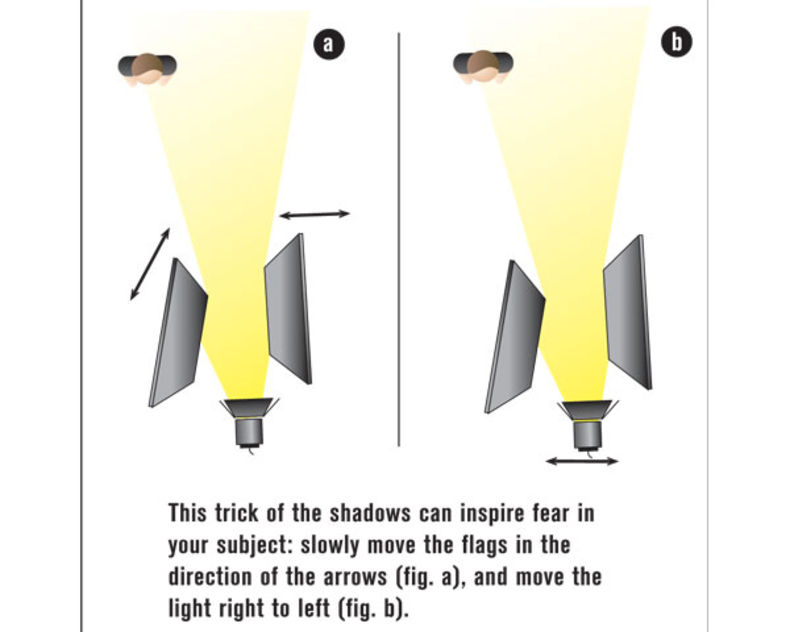
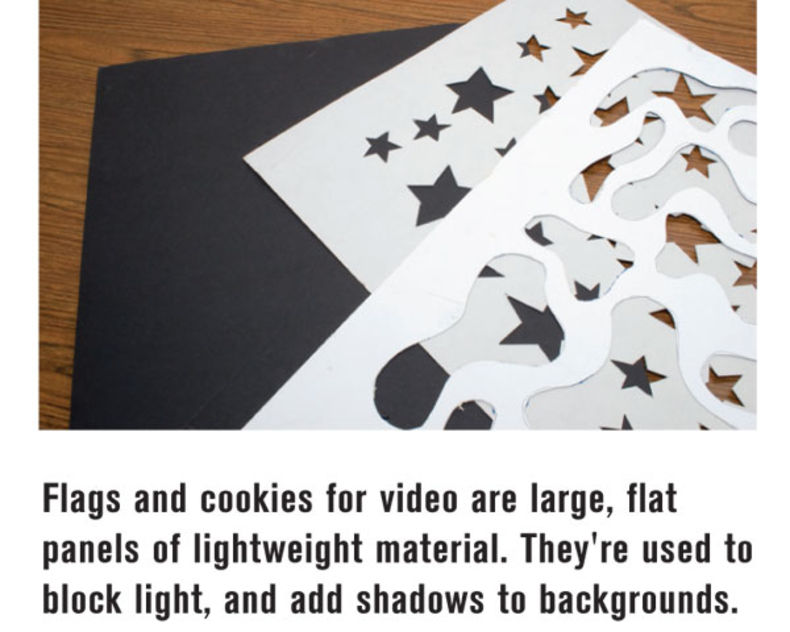
You need to place your lights in such a way as to produce shadows where you want them and light your subjects as you want them to appear. Shop lights cancast great shadows but they, too, can blast the whole set with light, so you need to interrupt some of that light so it won't spill all over the room. You want to control where the light goes and where it doesn't go. The easiest way to do this is with large "flags" which are placed in front of your lights to create hard-edged shadows.
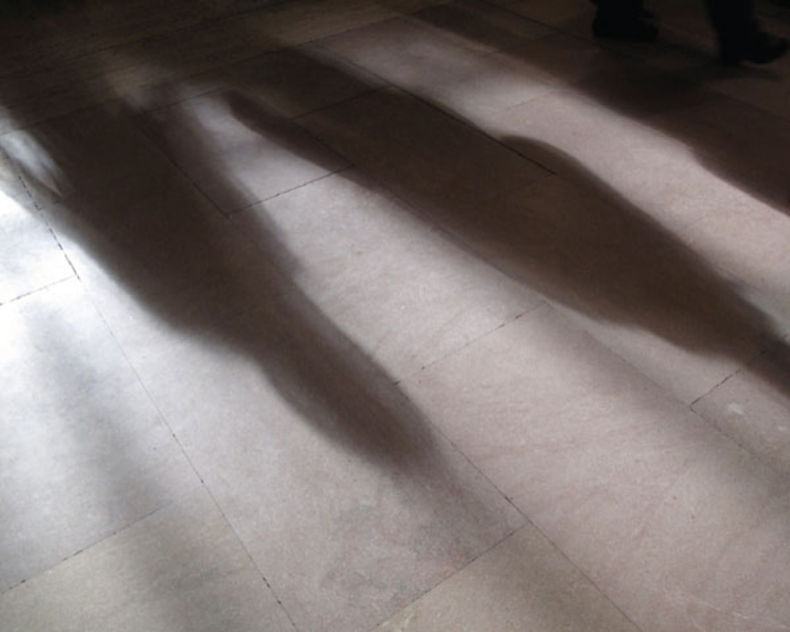
The cool thing about these flags is that you can move them slowly during a shot which moves the shadows they cast, too. Do this while moving the lights in a different direction and you get some pretty spooky lighting effects, (see Figures A and B.) If you also dim and flicker the lights - things can get pretty creepy. Add some flashing from a still camera's flash to create lightning in the room, throw in a red gel attached to an LED flashlight, blink your on-camera light and you may even scare yourself into the next century!
So far you have made some nice dramatic color shifts by creatively white balancing your camera to match shop lights while allowing the ambient light to become blue. You have made the light move around with your flags and added a bit of mystery with a gelled flashlight, a still camera flash and an on-camera light. But as with all productions, even low budget horror films, you must consider safety and if you choose to shoot at night, there is the lack of light on set that can pose risks, be it tripping on cords or forgetting equipment in the dark. If you have halogen lights on set, safety is of paramount importance because they get very hot and can easily set fire to just about anything they come in contact with so always use caution!
A good way to make large flags for a cheap production like this is to use panels of cardboard but for safety they must be held several feet from the lights and never above the lights. Another benefit of holding the flags farther from the lights is that this added distance better defines the shadows. If the flags need to be more permanent, look to foam core, sheetrock or even better - sheet metal which can easily be clamped to rolling stands or simply handled by assistants. These materials can be found at most hardware stores. You could also consider using a cuculoris or cookie. There are many ways to get creative with your lighting such as using adjustable spotlights, fresnel lights and even simple snoots or barn doors.

Barn Doors and Cookies

Barn doors are great accessories because they allow you to control the spill of your raw light fixtures. They are mounted to the fixture and consequently right next to the light source so the shadows from them are not very sharp and have soft edges. That's where the large flags come in. They are really just big barn doors that are held further from the light source. That distance gives the shadow a dramatic, hard edge. It's really a budget-saving way to get nicely defined shadows just like focusing spots and fresnels except at a fraction of the cost! Walking the flags around moves the shadow which is great for that mysterious effect, and the beauty of learning this technique is you understanding how to place shadows exactly where you want them.
Consider a straightforward interview where you would like to light only part of background and leave other parts in shadow or even project patterns on the background. This is exactly what a cookie does. It interrupts the light in some places and allows the light through in others, thus projecting a pattern of light and shadows. The farther a cookie is from the light the better definition the shadows have. Matthews Studio Equipment makes wooden cookies and companies like Lowel, Smith-Victor and others make a huge assortment of lights and modifiers that will allow you to do just about anything your heart desires.
You should consider the lighting techniques presented here just a primer because with the art of horror filmmaking, anything goes! The great thing about horror lighting is it doesn't need a great deal of specialized equipment. Anything you build or purchase for your "horror film kit" can nicely fit into your regular kit because special effects in movies often consist of just great lighting and all you are doing is changing the way you use each lighting tool. So... anything you learn on this production can easily be adapted to rest of video production, and that's great knowledge.

Sidebar: What You DON'T See in the Shadows

The absence of light magnifies sound, which can indicate creepies from behind the camera. Let's take the idea of using shadows to tell our story, at some point you will want your audience to feel uneasy, just like a character on screen. By having just a few instances of absolute blackness your audience will have no idea what's coming next, now this isn't to say you hold a long black, since that will remind the audience that they're sitting in a theater or home and watching a production. Instead let the audio take control - when's the last time you felt cozy in an unfamiliar and dark room with creepy music and a chainsaw start up?
Another trick suitable for the horror genre is only possible due to the limited frame you allow the audience to see. With a spotlight and some well chosen tools or figures you may imply characters in your story with shadow. Like shadow puppetry, what the audience expects, is all that matters, you might use a grasping hand, or an object like a doll, anything that represents terror. These should be easy to distinguish items and their shadow may be all that is required to get an emotional response from your audience, just be sure to follow our advice on how to operate the light causing the shadow and you'll have a fun and effective way to paint your story in light.

Source: VideoMaker